آموزش اندروید استودیوآموزش های برنامه نویسی اندروید

آموزش برنامه نویسی اندروید با اندروید استودیو (بخش بیست و ششم: آموزش برنامه نویسی نوتیفیکیشن در اندروید)
همه با نوتیفیکیشن در اندروید آشنا هستیم.
Notification ها هشدار های بی موقع یا حتی با موقع برنامه ها، که برای اطلاع از وضعیتی به کاربر داده می شوند، هستند. خیلی از مواقع این هشدار ها آزار دهنده هستند و خیلی از مواقع نیز این هشدار ها بسیار به درد کاربر می خورند.
نوتیفیکیشن در لغت به معنای اطلاع، اخطار و یا آگاه ساز است.
در این قسمت از آموزش برنامه نویسی با اندروید استودیو، به نحوه کار با Notification پرداخت می شود.

من یک پروژه جدید با نام Notifications_Gsm ایجاد نموده ام.
از قسمت Paletteها یک ابزار Button به لایه برنامه می کشیم. این ابزار جهت فراخوانی نوتیفیکیشن به کار می رود.
می خواهیم در هنگام کلیک بر روی Button (زدن دکمه Button) ، نوتیفیکیشن نمایش داده شود.
کد Button من:
<Button
        android:text="Button"
        android:layout_width="wrap_content"
        android:layout_height="wrap_content"
        android:layout_alignParentTop="true"
        android:layout_centerHorizontal="true"
        android:layout_marginTop="203dp"
        android:id="@+id/button" />
کار با کد Notification بسیار ساده است.
به سراغ کلاس جاوا یعنی فایل اصلی برنامه MainActivity.java می رویم. کدهای نوتیفیکیشن را برای آن می نویسیم.
این کدها در زیر به همراه توضیحات آمده است.
کد نوع اول
public class MainActivity extends Activity {

// صدا زدن نوتیفیکیشن
private static final int notifyid = 1;

@SuppressWarnings("deprecation")
@Override
protected void onCreate(Bundle savedInstanceState) {
super.onCreate(savedInstanceState);
setContentView(R.layout.activity_main);

//افزودن ایکون به نوتیفیکیشن
int icon = R.drawable.ic_launcher;

//مقدار دهی و تنظیمات نوتیفیکیشن
CharSequence tickerText = "تست اولین نوتیفیکیشن";
long when = System.currentTimeMillis();
Context context = getApplicationContext();
CharSequence contentTitle = "نوتیفیکیشن";
CharSequence contentText = "نوتیفیکیشن ساخته شد";

Intent notificationIntent = new Intent(this, MainActivity.class);
PendingIntent contentIntent = PendingIntent.getActivity(this, 0,  notificationIntent, 0);

// بعد از مقدار دهی،نوتیفیکیشن رو تعریف میکنیم
final Notification notification = new Notification(icon, tickerText, when);
notification.setLatestEventInfo(context, contentTitle, contentText,  contentIntent);

//فراخوانی تنظیمات و مقدار دهی نوتیفیکیشن جهت نمایش
String ns = Context.NOTIFICATION_SERVICE;
final NotificationManager mNotificationManager = (NotificationManager)  getSystemService(ns);

//معرفی دکمه و ایجاد قابلیت کلیک برای ان
Button btnnotify = (Button) findViewById(R.id.button1);
btnnotify.setOnClickListener(new View.OnClickListener() {
public void onClick(View v) {
//فعال کردن نوتیفیکیشن در هنگام کلیک بروی دکمه
mNotificationManager.notify( notifyid, notification);
}
});
}
توجه کنید که این کد ممکن است برای API شما کار نکند. چون notification.setLatestEventInfo برای همه ی ورژن های SDK وجود ندارد.
به جای آن می توانید از کد زیر نیز استفاده نمایید. قسمتی که به جای کد بالا جایگزین شده است در داخل کد گفته شده است.
کد نوع دوم
package com.gsm_developers.notifications_gsm;

import android.app.Notification;
import android.app.NotificationManager;
import android.app.PendingIntent;
import android.content.Context;
import android.content.Intent;
import android.support.v7.app.AppCompatActivity;
import android.os.Bundle;
import android.view.View;
import android.widget.Button;

public class MainActivity extends AppCompatActivity {

    private static final int notifyid = 1;

    @Override
    protected void onCreate(Bundle savedInstanceState) {
        super.onCreate(savedInstanceState);
        setContentView(R.layout.activity_main);

        Intent notificationIntent = new Intent(this, MainActivity.class);

        PendingIntent contentIntent = PendingIntent.getActivity(this, 0,  notificationIntent, 0);

        String ns = Context.NOTIFICATION_SERVICE;
        final NotificationManager mNotificationManager = (NotificationManager)  getSystemService(ns);

// این قسمت از کد به جای قسمتی که در کد بالا مشکل داشت آورده شده است
        Notification.Builder builder = new Notification.Builder(MainActivity.this);
        PendingIntent pendingIntent = PendingIntent.getActivity(this, 0,notificationIntent, 0);
        builder.setSmallIcon(R.drawable. notification_template_icon_bg)
                .setContentTitle("نوتیفیکیشن شما راه اندازی شد")
                .setContentIntent(pendingIntent);
        NotificationManager notificationManager = (NotificationManager) getSystemService(NOTIFICATION_SERVICE);
        final Notification notification = builder.getNotification();

// نمایش نوتیفیکیشن توسط زدن دکمه
        Button btnnotify = (Button) findViewById(R.id.button);
        btnnotify.setOnClickListener(new View.OnClickListener() {
            public void onClick(View v) {

                mNotificationManager.notify( notifyid, notification);

            }
        });
    }
}
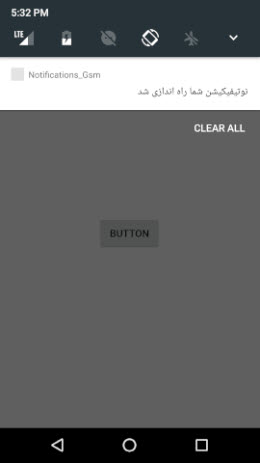
بعد از کلیک بر روی BUTTON، خروجی شما به صورت زیر است.